A Report
                                    on 
                                    
                                    Use of
                                    TINI 400 Kit


                                    Mobile
                                    Weather Station Project
                                    
                                    Embedded
                                    Systems Programming


                                    Project
                                    Guide: Prof. Prabhat Ranjan


                                    Group
                                    Members:
                                    
                                    Ashish
                                    Kumar       Polana Swetha       Prabhat Saraswat


                                    Dhirubhai Ambani Institute
                                    of Information and Communication Technology, Gandhinagar
                                    
                                    1.   
                                    Introduction
                                    
                                    TINI is a small, embedded system designed to run Java(tm)
                                    applications and interface between external hardware and a network.


                                    To start working with TINI, one needs to have the following
                                    requirements satisfied. 
TINI Hardware Requirements 


                                    - TINIm400
                                    Verification Module 
- TINIs400 Socket
                                    Board
       TINI
                                    Software Requirements 


                                    - TINI Software Development Kit
                                    Version 1.15 (tini1.15)
- JDK (Java Development Kit) – jdk1.1.6
- Java Communications API 
      
                                    Development System Requirements 


                                    - 1 RS232 (COM) port
                                    - 115200 baud
- RS232C serial cable DB9 male to DB9 female
- Crossover Ethernet cable
- 5V DC Power Supply
                                    capable of supplying 150mA 
The TINI Board Model 400: DSTINIm400
                                    
                                    The TINI reference board based on the DS80C400 processor is
                                    known as the DSTINIm400 reference module. 


                                    Configuration of DSTINIm400 
                                    
                                    1MB of nonvolatile, static RAM and 1MB of flash. It is
                                    available as a 144-pin SODIMM module. 


                                    DSTINIs400: The Socket for the DSTINIm400
                                    
                                    For application development and prototyping, a DSTINIm400
                                    board is not useful without the ability to connect necessities such as serial,
                                    Ethernet, and power. The main function of the DSTINIs400 socket board is to
                                    provide physical connectors to interface the DSTINIm400 with other equipment
                                    such as an Ethernet network, a serial device, or a 1-Wire network.


                                    2.   
                                    Connections
                                    
                                    After
                                    downloading all the required files, the following connections have to be made.
                                    
                                    
                                    - Verify
                                    power is not supplied to the TINIs400 sockets board.
- Insert the TINIm400
                                    Verification Module into the 144-pin connector on the TINIs400     sockets
                                    board. 
- Verify that the jumpers with
                                    the labels J4, J6, J10 and J14 are placed on the socket
                                    board as mentioned below.
                                    
                                    - J4 (110)
- J6 (110)
- J10 (110)
- DTR Reset (J14) 
- TINI uses DTR as a control
                                    signal for reset.
                                    - Attach an RS232 serial cable to
                                    the connector labeled "Loader - Serial 0" on the TINIm400
                                    sockets board.
- Connect the serial cable to a
                                    serial port on the PC.
- Connect the power adapter to
                                    TINIs400 sockets board. A center positive 5V DC regulated power supply
                                    must be used with the TINIs400 sockets board. 
- Attach the crossover Ethernet
                                    cable between the PC and TINIs400 sockets board. 
- Plug the power adapter into a
                                    wall socket. 
 
                                    
                                    3. Running JavaKit
                                    
                                    Once
                                    the system is correctly configured to use javax.comm, run JavaKit
                                    
                                    
                                    - Include the jar file tini.jar in the
                                    classpath.  
 set CLASSPATH=/root/tini/tini1.15/bin/tini.jar;$CLASSPATH
                                    
                                    
                                    - To run JavaKit, go the bin directory
                                    of tini1.15  (/root/tini/tini1.15) and run 
 java –JavaKit -400 -flash 40
                                    
                                    
                                    - In JavaKit, select the serial port to
                                    which the serial cable from TINI is attached. If no serial port names
                                    appear in the port name list, this means that javax.comm has not been
                                    installed correctly
- The
                                    baud rate should be set to 115200.
- Press the "Open Port" button.
- Press the "Reset" button.
                                    This will reset the board to the TINI loader.  This can be done at any
                                    time to abort slush and all running applications and return to the TINI
                                    loader.
- Press E and press return.
                                    Then the Slush will begin booting and text
                                    will appear on the JavaKit screen.
                                    - Press return and a Slush login
                                    prompt will be displayed. Type in the username root and press return. The
                                    initial root password is tini. 
- We are now logged into Slush.
                                    To view a list of valid shell commands, type help at the command prompt.
                                    Detailed information on specific commands can be obtained by typing help
                                    followed by the command. 
 
                                    
                                    4.   
                                    Running
                                    Applications in TINI
                                    
                                    
                                    - Create the source file. Create
                                    and save a file named HelloWorld.java containing the source code to
                                    display “Hello World” on screen.
- Compile the source file. Compile
                                    HelloWorld.java to a class file using the command   javac –target 1.1
                                    HelloWorld.java
- Convert
                                    the class file. The utility program TINIConvertor performs a
                                    conversion on input, specifically one or more Java class files, and outputs
                                         a binary image suitable for execution on TINI. TINIConvertor is a Java
                                         application that lives in the tini.jar file and is run from a command
                                         shell on the host
 
                                    
                                    To convert
                                    HelloWorld.class to a binary image that we can execute on TINI, run TINIConvertor
                                    supplying the three mandatory command line parameters: input file or directory
                                    (-f), API database (-d), and output file (-o). 
                                    
                                    java
                                    -classpath /root/tini/tini1.1.5/bin/tiniclasses.jar TINIConvertor -f
                                    HelloWorld.class -d  /root/tini/tini1.1.5/bin/tini.db -o HelloWorld.tini


                                    The other
                                    input required by TINIConvertor is the name of the API database distributed in
                                    the SDK. This file is named tini.db and must be supplied with the -d parameter.


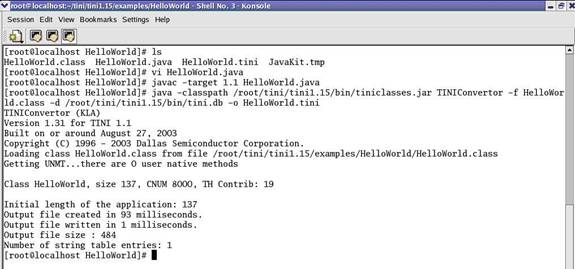
                                    Figure 1: Generating
                                    TINI image file from java file


                                    4. Load
                                    the converted image. 
                                    
                                    Use
                                    the FTP client provided with the operating system to connect to TINI and
                                    transfer the 
                                    
                                    binary image,
                                    generated in the previous step, to the TINI file.
                                    
                                    ftp
                                    192.168.1.20


                                    Now, run HelloWorld.tini
                                    
                                    Tini1 />java HelloWorld.tini
                                    
                                    Hello World from DA-IICT
                                    
                                    Tini1 />
                                    
                                    The same can
                                    be checked in the JavaKit also 


                                    5.   
                                    Booting Slush
                                    for the First Time
                                    
                                    Running JavaKit
                                    
                                    Follow
                                    the above-mentioned steps till step # 6 i.e. after getting the loader prompt,
                                    
                                    
                                     - At the JavaKit prompt, type B0
                                         and press return followed by F0 and return. This clears the RAM of the
                                         TINI Verification Module. Any time a new runtime environment is loaded the
                                         memory should be cleared. 
- Now click on the File menu in
                                         JavaKit and select Load File. A file dialog will appear on the screen.
                                         Browse to the <TINI SDK Install Dir>\bin directory and select the
                                         tini_400.tbin file and click the Open button. Load Complete will be
                                         displayed on the screen when the firmware is loaded, this may take up to
                                         30 seconds. 
- To load the command shell,
                                         click on the File menu and select Load File again. Select the
                                         slush_400.tbin file and click on the Open button. When Load Complete
                                         appears, slush has been successfully loaded into the flash of the TINIm400
                                         Verification Module. 
- Press the reset button and the
                                         JavaKit loader prompt shown in Figure 1 will be displayed. 
- At the JavaKit prompt, type E and hit return. 
- Type in the username root and press return. The initial
                                         password is tini.
- Now, we can run Java applications after logging in as
                                         explained above.
Table 1. Default
                                    User Accounts for Slush


                                      | User Name | Initial Password | 
                                     
                                      | Root | Tini | 
                                     
                                      | Guest | Guest | 


                                    We worked
                                    with 2 TINIm400 modules, the hostnames being TINI1 and TINI2.
                                    
                                    When working
                                    with TINI1, to use another module, the JavaKit need not be restarted again.
                                    Just remove the first module from the socket, connect the second module in the
                                    same socket and press ‘Reset’ in the JavaKit.  After logging in, slush returns
                                    a prompt comprised of the host name, TINI2. Now, we can work on TINI2 in a
                                    similar manner. 


                                    6.   
                                    Configuring the
                                    Network
                                    
                                    Use the slush
                                    command “ipconfig” to set network configuration information. We can use the –d
                                    option to dynamically obtain an IP address and subnet mask as well as several
                                    other network parameters. For static network configuration, the following command sets the IP address and subnet
                                    mask.
                                    
                                    TINI /> ipconfig -a 192.168.0.22 -m 255.255.255.0


                                    7.   
                                    Debugging
                                    TINIs400
                                    
                                    On
                                    loading the files tini_400.tbin and slush_400.tbin, they were loaded
                                    successfully but the following message was displayed before ‘Load Complete’.
                                    
                                    ‘Call System
                                    interrupted in drain’


                                    After typing E (enter), the slush
                                    was not loaded properly and the login prompt was not displayed. Then we used
                                    the debug port option to find out the problem and realized that the boot loader
                                    was dead. The TINIs400 socket board has a debug port option for diagnostic
                                    messages. This debug port (connected to port pin P5.2) is a write-only
                                    pseudoserial port and does not use any of the serial ports of the TINI400
                                    system. The debug port is shared with the status LED on the TINIm400, so the
                                    LED flickers when the debug port is used. Connect the diagnostic port J6 to the
                                    PC.
                                    
                                    To
                                    display the debug messages on the PC, we can use JavaKit or any other terminal
                                    program set to 115200, 8N1. Load tini_debug_400.tbin instead of tini_400.tbin.
                                    We can switch between these two firmware versions without clearing the
                                    heap/file system. 
                                    
                                    Updating Loader
                                    
                                    Since there was a problem of
                                    deadbootloader, we loaded a new boot loader onto the TINI using the option
                                    ‘UpdateLoader’. The file ‘LoaderLoader.hex’ has to be downloaded Go the file
                                    menu and find the option ‘UpdateLoader’ and load the file ‘LoaderLoader.hex’.